Appearance
本文以演示环境如下:
| 操作系统 | 系统类型 | 作者 |
|---|---|---|
| kylinOS | x86_64 | 张世平 |
部署准备
①WindTerm,远程访问Linux系统,输入命令使用
WindTerm 是一款支持 Windows、Linux 和 MacOS 的 SSH 客户端工具 下载地址:
- 下载 WindTerm.zip
②WinSCP,远程访问Linux系统,复制代码文件、修改Nginx配置项使用
WinSCP 是一款好用 SSH 图形化 SFTP 客户端工具 下载地址:
- 下载 WinSCP.exe
③用WindTerm、WinSCP远程连接Linux系统
解压WindTerm后,双击运行WindTerm.exe
在会话页面,右键‘新建会话’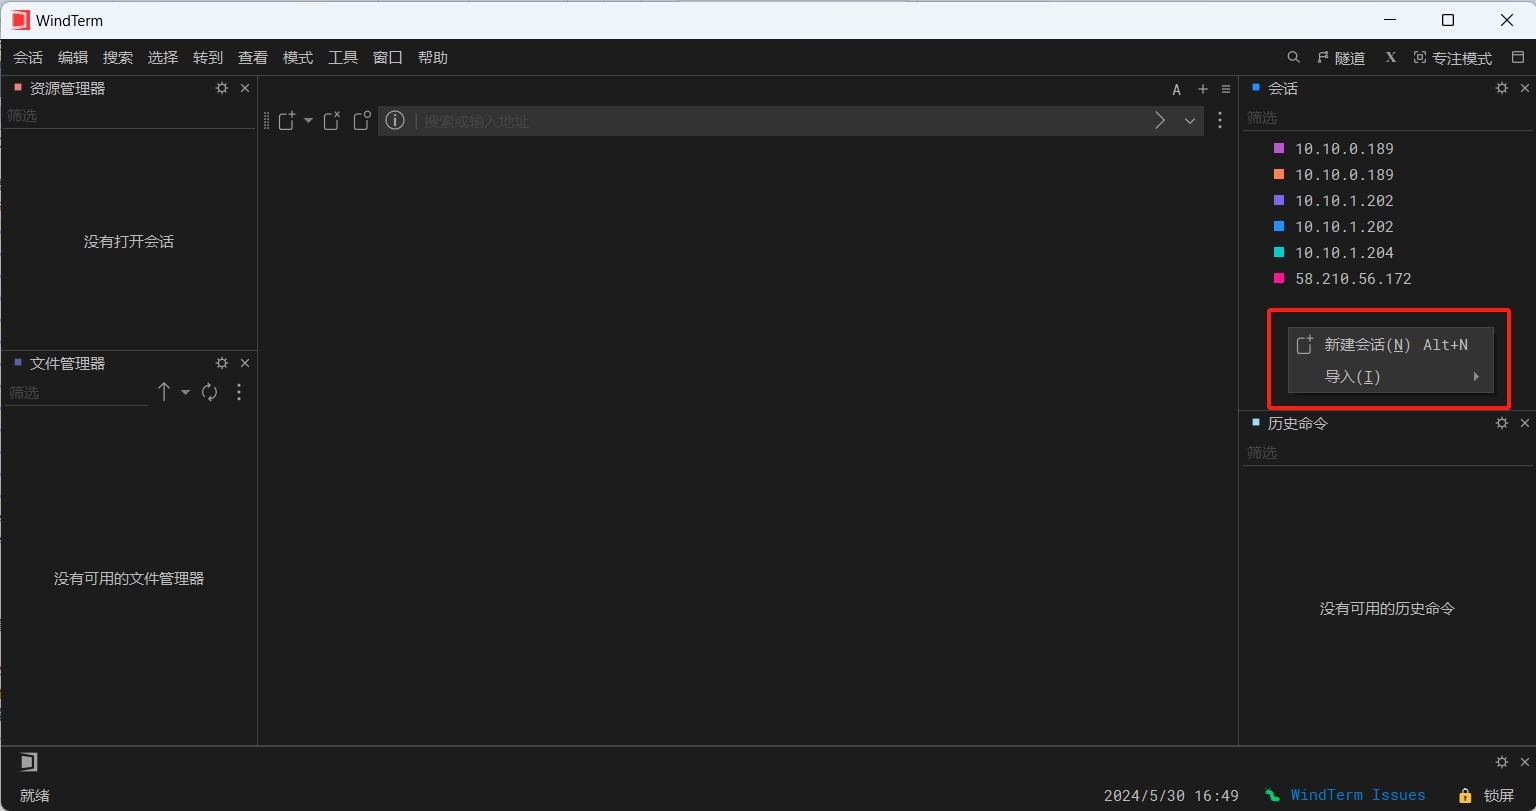
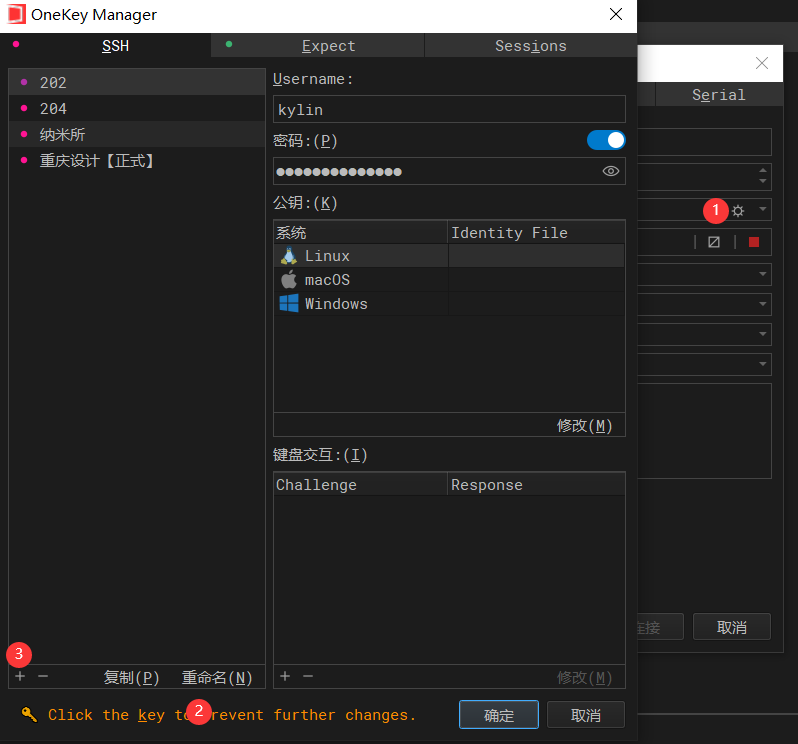
主机:(H) Linux系统IP地址;端口:(P) 22 默认端口,可修改;OneKey:设置Linux系统的用户名,密码 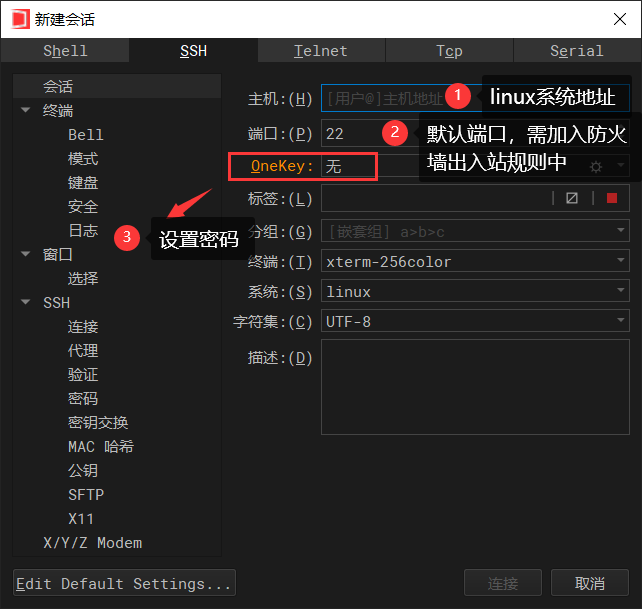
添加完成后,双击会话列表中的linux系统地址,进入linux命令页面;
双击linux系统地址,此处需要下拉选择设置的密码;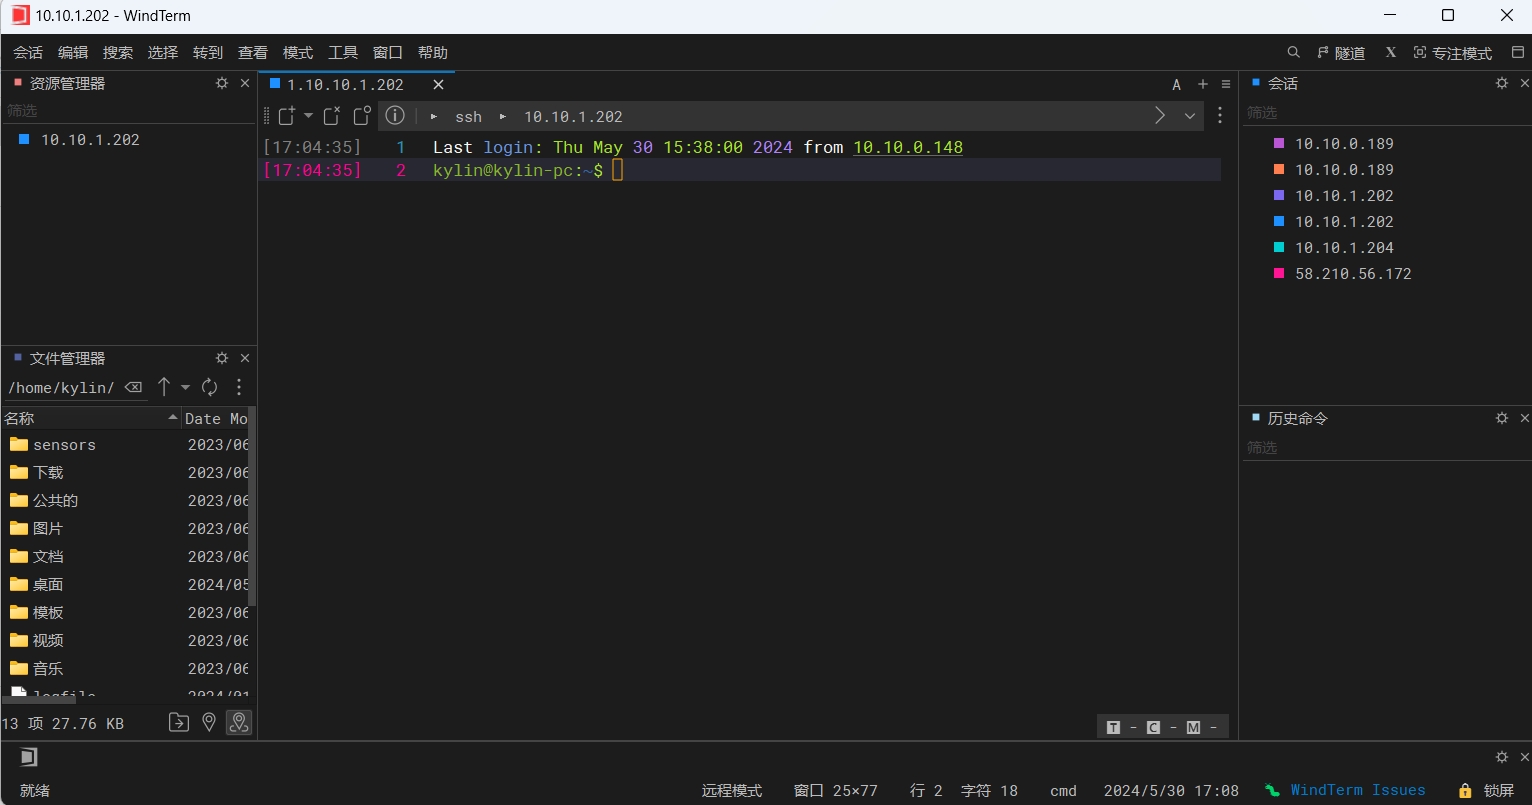
检查服务器是否可以访问互联网
SSH
ping baidu.comCtrl+C退出命令窗口 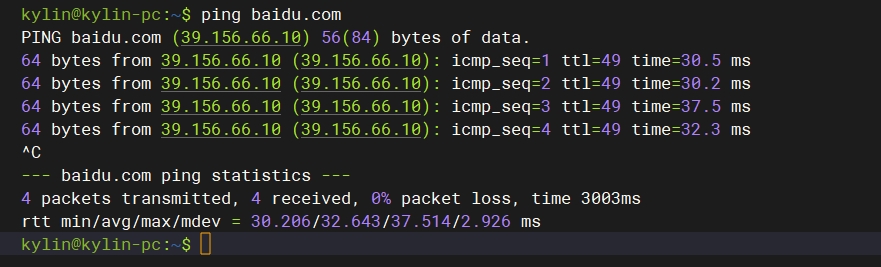
如显示 64 bytes from 39.156.66.10 (39.156.66.10): icmp_seq=1 ttl=49 time=30.5 ms,说明Linux可以访问互联网,支持在线安装部署;
在线安装dotnet
查看操作系统版本:
uname -a显示:Linux node12 4.19.90-52.22.v2207.ky10.aarch64 #1 SMP Tue Mar 14 11:52:45 CST 2023 aarch64 aarch64 aarch64 GNU/Linux
所有版本dotnet下载地址:
https://dotnet.microsoft.com/zh-cn/download/dotnet/6.0
①下载(dotnet-sdk-6.0.407)
----x86_64下载地址----
SSH
wget https://download.visualstudio.microsoft.com/download/pr/868b2f38-62ca-4fd8-93ea-e640cf4d2c5b/1e615b6044c0cf99806b8f6e19c97e03/dotnet-sdk-6.0.407-linux-x64.tar.gz----aarch64下载地址----
SSH
wget https://download.visualstudio.microsoft.com/download/pr/ec8e29f5-2fbe-47d8-b0c5-81f11434c00f/ba4bd30be448d649e5ddf1991bf76252/dotnet-sdk-6.0.425-linux-arm64.tar.gz②安装dotnet-sdk-6.0.407
----x86_64下载地址----
SSH
mkdir -p /usr/share/dotnet && tar zxf dotnet-sdk-6.0.407-linux-x64.tar.gz -C /usr/share/dotnet----aarch64下载地址----
SSH
mkdir -p /usr/share/dotnet && tar zxf dotnet-sdk-6.0.425-linux-arm64.tar.gz -C /usr/share/dotnet③配置
运行以下命令,使环境变量生效:
SSH
ln -s /usr/share/dotnet/dotnet /usr/bin/dotnet④验证安装
运行以下命令验证 .NET 6 是否安装成功:
SSH
dotnet --version在线安装Nginx
①安装nginx所需要的依赖包
SSH
yum install -y gcc-c++ zlib zlib-devel openssl openssl-devel pcre pcre-develgcc、gcc-c++ # 主要用来进行编译相关使用
openssl、openssl-devel # 一般当配置https服务的时候就需要这个了
zlib、zlib-devel # 主要用于文件的解压缩
pcre、pcre-devel # Nginx的rewrite模块和HTTP核心模块会用到PCRE正则表达式语法
②安装Nginx
SSH
yum install nginx③查看Nginx安装路径
SSH
whereis nginx/etc/nginx,Nginx配置文件所在路径 /usr/sbin,Nginx启动文件所在路径
④修改配置文件
使用WinSCP工具,切换到/etc/nginx文件夹,双击打开nginx.conf,可修改Nginx配置文件
⑤启动Nginx
SSH
cd /usr/sbin
./nginx   #启动
./nginx -s stop  #停止
./nginx -s quit  #退出
./nginx -s reload  #重启
⑥验证Nginx是否安装成功
SSH
开放端口:
firewall-cmd --zone=public --add-port=80/tcp --permanent

重启防火墙:
systemctl restart firewalld
打开浏览器,输入 IP 地址即可,默认使用 80 端口,如果弹出。
PMwise6.0程序部署
①部署应用程序
下载文件:https://sh.goodwaysoft.com:8257/GoodWay.rar
解压GoodWay.rar文件
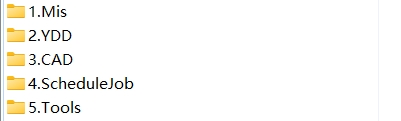 1.Mis:存放Mis端代码
2.YDD:存放移动端代码
3.CAD:存放CAD接口代码
4.ScheduleJob:存放定时作业代码
5.Tools:其它文件
-a. bin 文件夹,存放dotnet启动命令
-b. Nginx 文件夹,存放Nginx的配置文件
-c. service 文件夹,存放Mis端启动服务
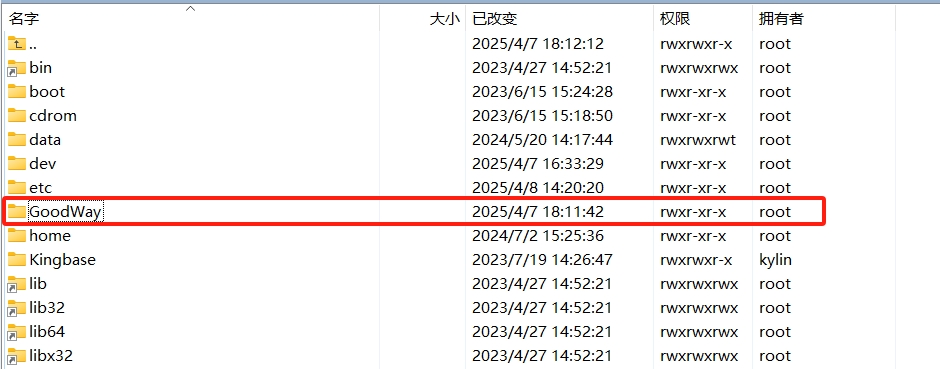
-d. 东方通 文件夹,存放东方通的配置文件打开WinSCP工具,复制文件夹GoodWay到Linux系统根节点下
复制代码到1.Mis文件夹下
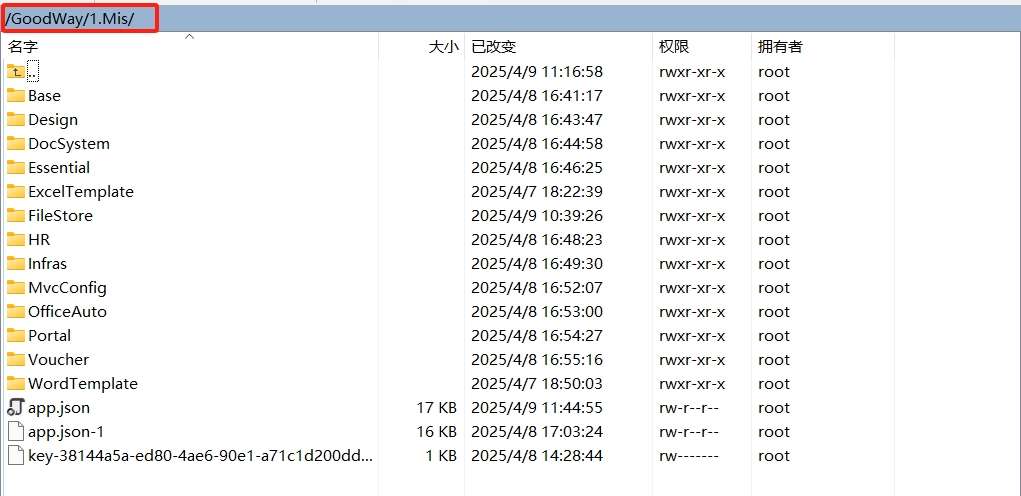
修改1.Mis文件夹下的app.json配置文件
修改数据库链接: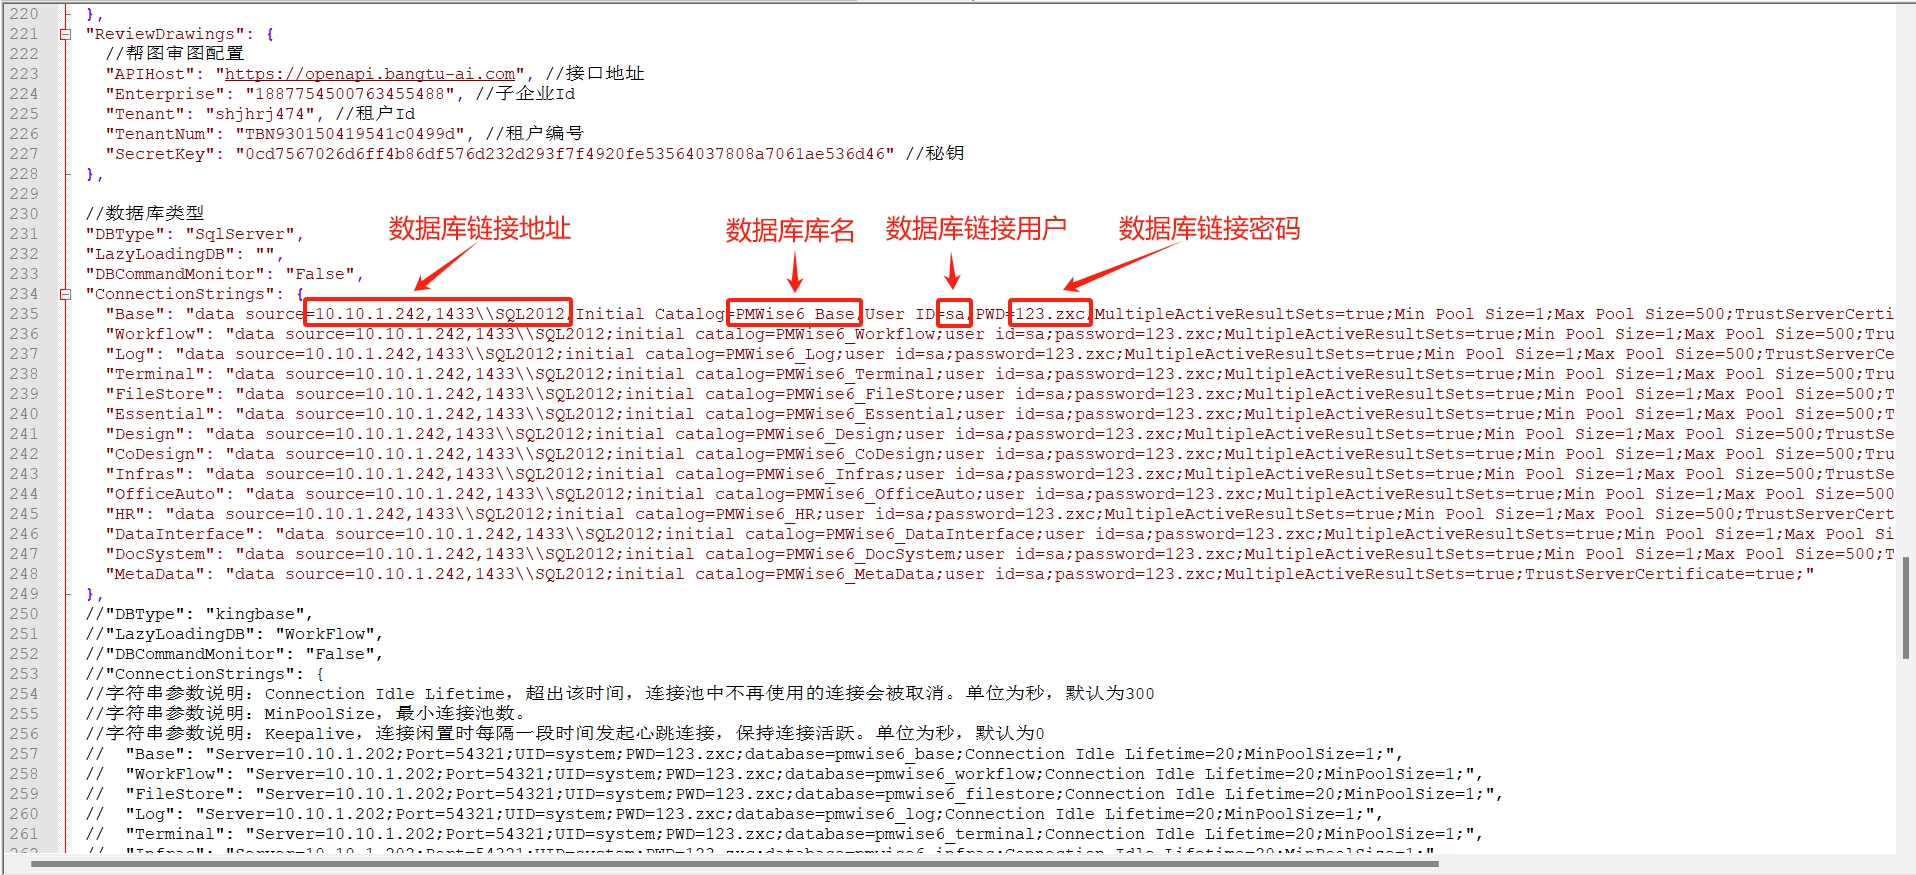 修改授权码,新版授权码,根据电脑的mac地址生成,输入命令 ip addr show,查看电脑mac地址:
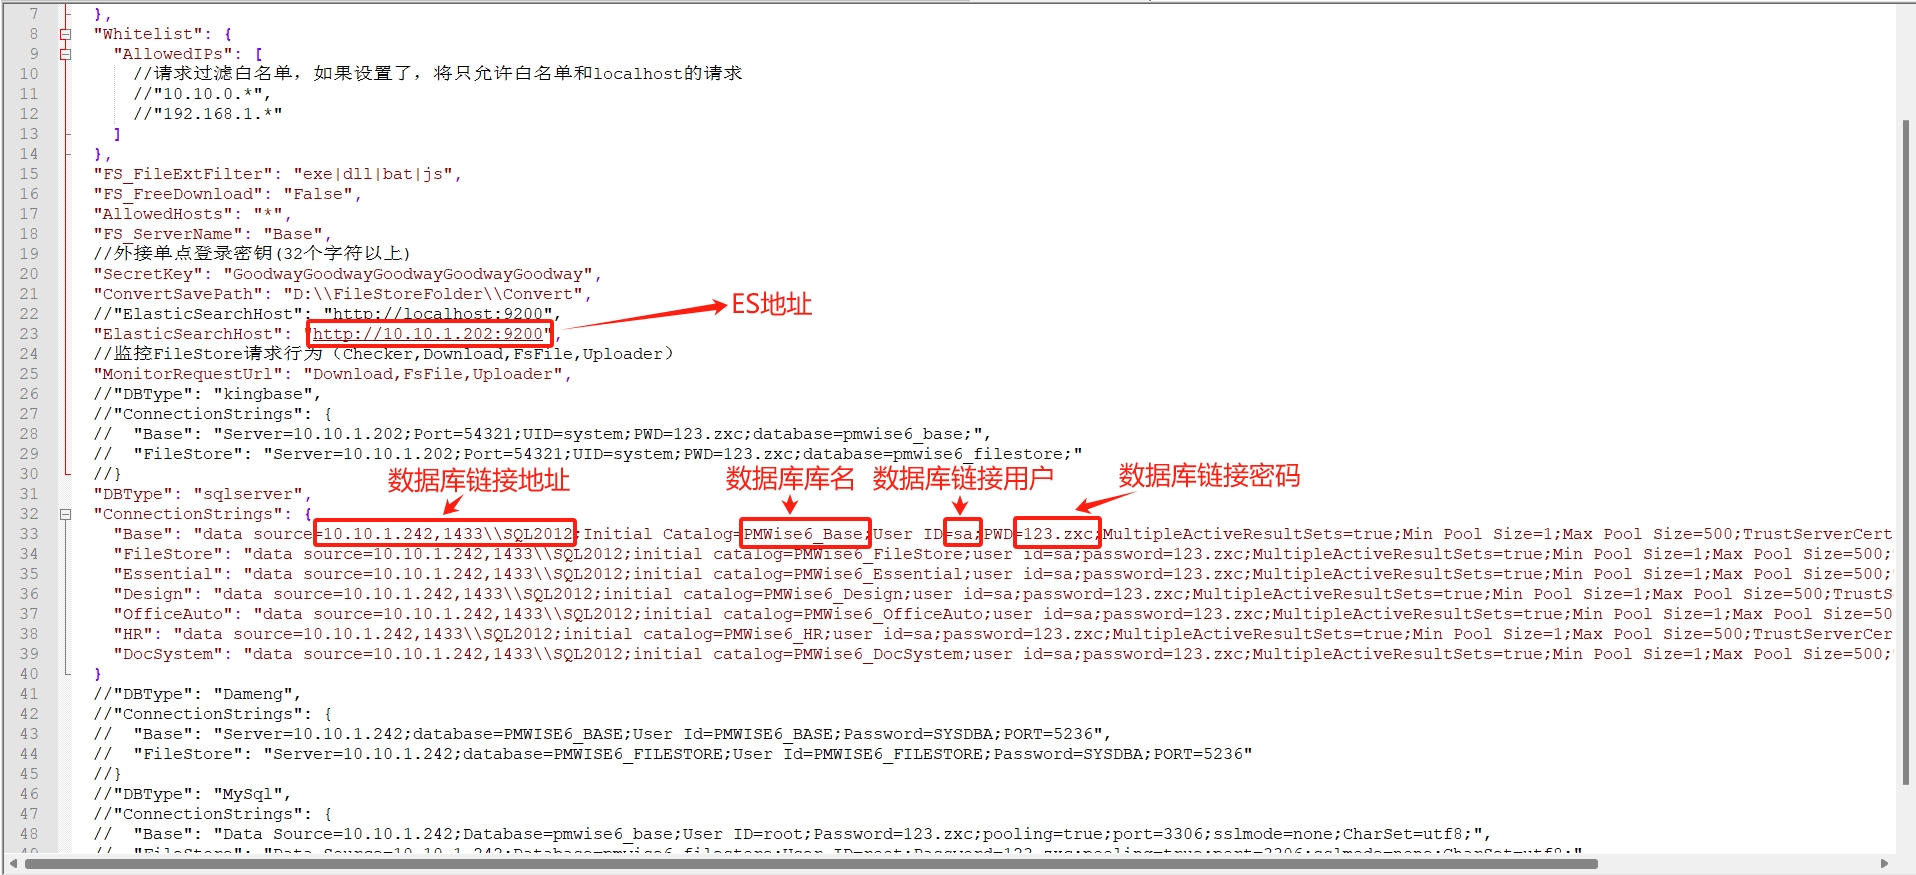
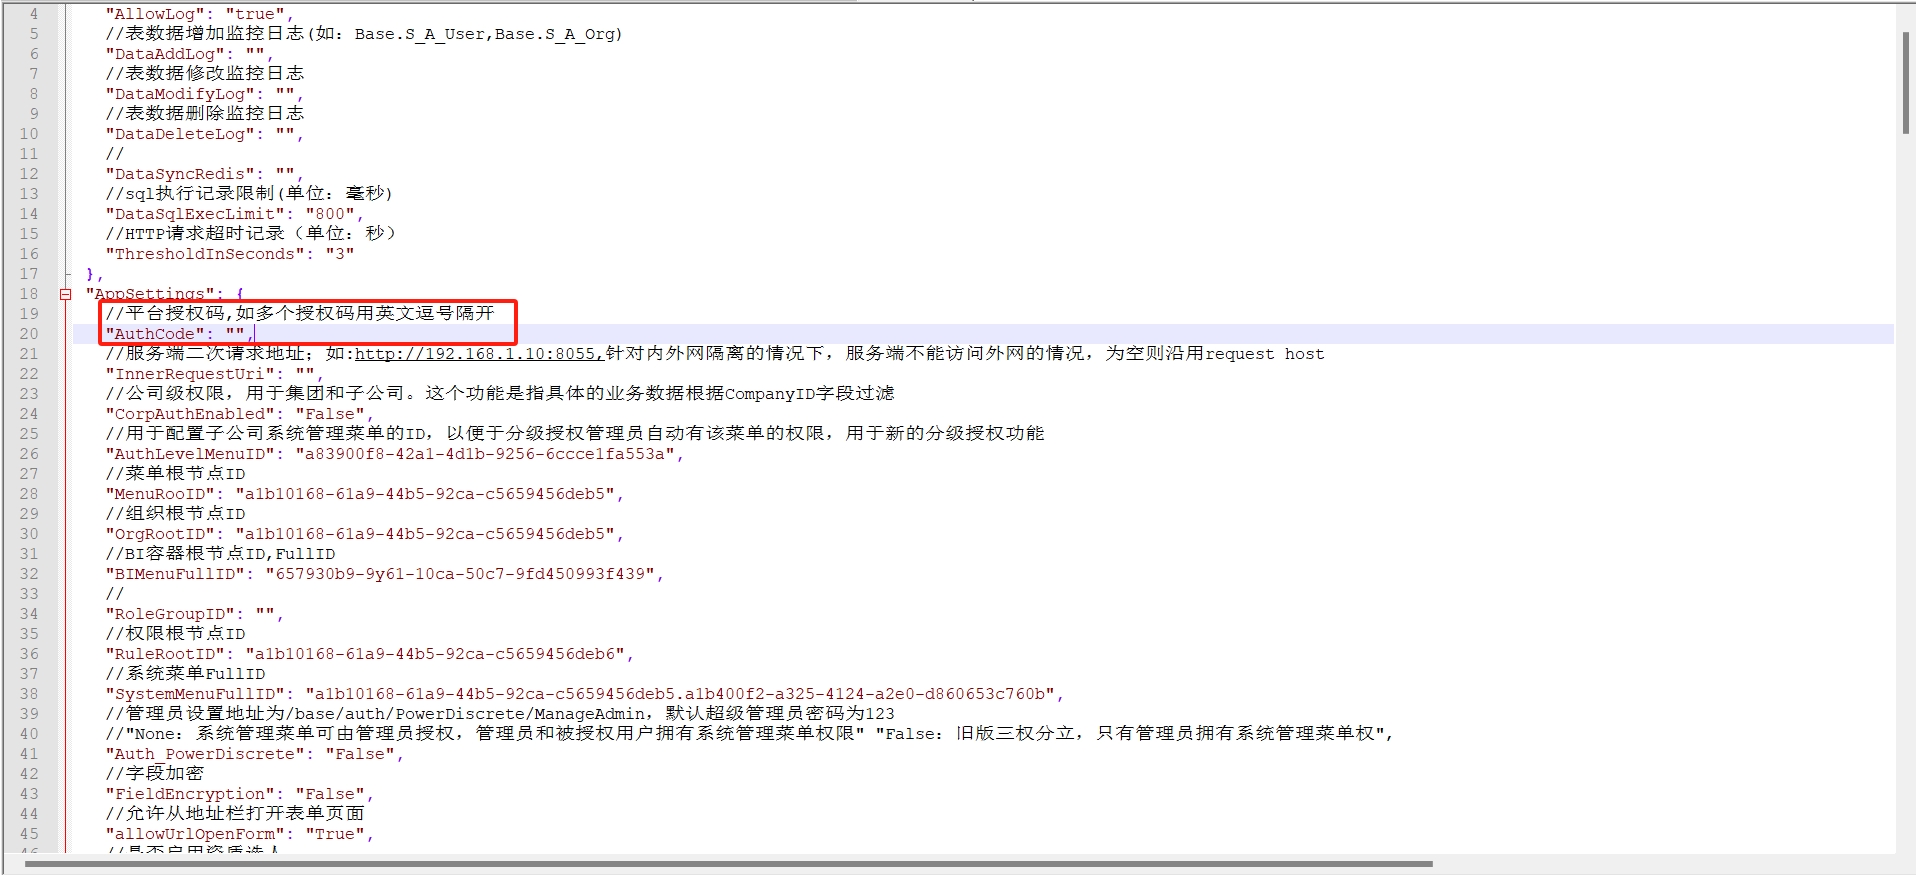 修改ES链接地址,示例:http://10.10.0.189:9200
"ElasticSearchConfig": { "Host": "http://10.10.0.189:9200" },修改FileStore下的appsettings.json配置文件
切换到WindTerm工具,连接linux系统,设置权限
sudo chmod +x /GoodWay/5.Tools/bin/Mis_services.sh- 启动dotnet进程
sh /GoodWay/5.Tools/bin/Mis_services.sh- 查看正在运行的dotnet 进程列表
ps aux | grep dotnet- 开放端口
SSH
firewall-cmd --zone=public --add-port=8080/tcp --permanentSSH:
systemctl restart firewalld②根据应用程序配置Nginx
找到 Nginx 的目录
SSH
whereis nginx/etc/nginx,Nginx配置文件所在路径 /usr/sbin,Nginx启动文件所在路径
修改 Nginx 配置文件,目录为“/etc/nginx”
使用 WinSCP 进入到此目录,打开 conf 文件夹下的 nginx.conf 文件进行编辑
直接复制粘贴以下配置进行覆盖,或者从GoodWay/5.Tools/Nginx/nginx.conf文件中复制
#user  nobody;
worker_processes  4;

#error_log  logs/error.log;
#error_log  logs/error.log  notice;
#error_log  logs/error.log  info;

#pid        logs/nginx.pid;


events {
    worker_connections  1024;
}

http {
    include       mime.types;
    default_type  application/octet-stream;
    # 将nginx代理的所有请求实体的大小限制为1024m
    client_max_body_size 10240m;

    log_format  main  '$remote_addr - $remote_user [$time_local] "$request" '
                      '$status $body_bytes_sent "$http_referer" '
                      '"$http_user_agent" "$http_x_forwarded_for"';

    access_log /var/log/nginx/access.log main;
    error_log /var/log/nginx/error.log warn;

    sendfile        on;
    #tcp_nopush     on;

    #keepalive_timeout  0;
    keepalive_timeout  120;

    #gzip  on;

    #PMwise6.0-Mis系统;
    server {
        listen       8080;
        server_name  localhost;

        location    / {
        rewrite ^(.*)$ /Portal/Main/Index permanent;
        }

        location    /Portal/ {
        proxy_pass  http://localhost:20001;
        }

        location    /Base/ {
        proxy_pass  http://localhost:20002;
        proxy_set_header Host $http_host;
        }

        location    /base/ {
        proxy_pass  http://localhost:20002;
        proxy_set_header Host $http_host;
        }

        location    /MvcConfig/ {
        proxy_pass  http://localhost:20003;
        }

        location    /FileStore/ {
        rewrite ^/FileStore(.*)$ $1 break;
        proxy_pass  http://localhost:20004;
        }

        location    /Essential/ {
        proxy_pass  http://localhost:20005;
        }

        location    /Design/ {
        proxy_pass  http://localhost:20006;
        }

        location    /Infras/ {
        proxy_pass  http://localhost:20007;
        }

        location    /HR/ {
        proxy_pass  http://localhost:20008;
        }

        location    /OfficeAuto/ {
        proxy_pass  http://localhost:20009;
        }

        location    /DocSystem/ {
        proxy_pass  http://localhost:20010;
        }

        location    /Voucher/ {
        proxy_pass  http://localhost:20011;
        }


        location    /CADServer/ {
        	rewrite "^/CADServer/(.*)$" /$1 break ; # 最终url中去掉/api前缀
        	proxy_pass  http://localhost:20012;
        	proxy_set_header Host $host:$proxy_port;
        }

		location    /WebApi/ {
        	rewrite "^/WebApi/(.*)$" /$1 break ; # 靠url靠?api靠
        	proxy_pass  http://localhost:20013;
        	proxy_set_header Host $host:$proxy_port;
        }

		#PMwise6.0-移动端【跟Mis端站点合并到一起配置方式】;
		location /MobileYDD/ {
			root /LinuxNet/YDD/PMwise6-202406/publish;
			index index.html index.htm;
		}

		# 代理自己的项目
		location /officemobile {
			alias	/LinuxNet/YDD/PMwise6-202406/publish/officemobile;
			index	index.html;
			# autoindex on;
			try_files  $uri $uri/ /officemobile/index.html;   #解决刷新404
		}

		# 配置代理vite中的跨域
		location /MobileYDD/interface/ {
			rewrite "^/MobileYDD/interface/(.*)$" /$1 break ; # 最终url中去掉/MobileYDD/interface/前缀
			proxy_pass	http://localhost:8060;
			proxy_set_header Host $http_host;
			proxy_set_header X-Real-IP $remote_addr;
		}

		# 配置代理vite中的跨域
		location /officemobile/interface/ {
			rewrite "^/officemobile/interface/(.*)$" /$1 break ; # 最终url中去掉/MobileYDD/interface/前缀
			proxy_pass	http://localhost:8060;
			proxy_set_header Host $http_host;
			proxy_set_header X-Real-IP $remote_addr;
		}

		# 配置代理vite中的跨域
		location /interface/ {
			rewrite "^/interface/(.*)$" /$1 break ; # 最终url中去掉/interface前缀
			proxy_pass	http://localhost:8060;
			proxy_set_header Host $http_host;
			proxy_set_header X-Real-IP $remote_addr;
		}

		# 配置代理vite中的跨域
		location /api/auth/login/ {
			proxy_pass	http://localhost:8060;
			proxy_set_header Host $http_host;
			proxy_set_header X-Real-IP $remote_addr;
		}
    }

    server {
        listen       8082;
        server_name  localhost;

        location    /{
        proxy_pass  http://localhost:20012;
        }
    }

	server {
        listen       8099;
        server_name  localhost;

        location    /{
        proxy_pass  http://localhost:20013;
        }
    }

    # another virtual host using mix of IP-, name-, and port-based configuration
    #
    #server {
    #    listen       8000;
    #    listen       somename:8080;
    #    server_name  somename  alias  another.alias;

    #    location / {
    #        root   html;
    #        index  index.html index.htm;
    #    }
    #}


    # HTTPS server
    #
    #server {
    #    listen       443 ssl;
    #    server_name  localhost;

    #    ssl_certificate      cert.pem;
    #    ssl_certificate_key  cert.key;

    #    ssl_session_cache    shared:SSL:1m;
    #    ssl_session_timeout  5m;

    #    ssl_ciphers  HIGH:!aNULL:!MD5;
    #    ssl_prefer_server_ciphers  on;

    #    location / {
    #        root   html;
    #        index  index.html index.htm;
    #    }
    #}

}
配置保存成功后请重启 Nginx
SSH
cd /usr/sbin    //进入Nginx的sbin目录
./nginx -s reload           //重启Nginx命令
把Nginx中配置的8080端口号,加入到出入站规则
SSH
开放Nginx端口:
firewall-cmd --zone=public --add-port=8080/tcp --permanent

开放Portal端口,Base,MvcConfig等都加入到出入站规则中:
firewall-cmd --zone=public --add-port=8080/tcp --permanent

重启防火墙:
systemctl restart firewalld
③测试验证系统是否搭建成功
启动Nginx监听的主站点 
部署.NET开机自启服务
切换到‘WinSCP’,在linux服务器上,复制/GoodWay/5.Tools/service/PMWise_services.service,到/etc/systemd/system文件夹中
①查看dotnet安装路径
SSH
which dotnet输出:/usr/share/dotnet/dotnet
显示dotnet的安装路径
② 修改PMWise_services.service【默认无需修改】
SSH
[Unit]
Description=PMWise Managed Services
After=network.target

[Service]
User=root
Type=simple
WorkingDirectory=/GoodWay/5.Tools/bin
ExecStart=sudo /GoodWay/5.Tools/bin/Mis_services.sh

[Install]
WantedBy=multi-user.target
③ 设置开机自启
运行以下命令,设置开机自启:
注册并启动启动服务
SSH
sudo systemctl enable PMWise_services.service启动服务
SSH
sudo systemctl start PMWise_services.service检查服务状态
SSH
sudo systemctl status PMWise_services.service重启服务
SSH
sudo systemctl restart PMWise_services.service检查服务状态
SSH
sudo systemctl status PMWise_services.service关闭服务
SSH
sudo systemctl stop PMWise_services.service部署Nginx开机自启服务
切换到‘WinSCP’,在linux服务器上,复制/GoodWay/5.Tools/service/nginx.service,到/etc/systemd/system文件夹中
① 修改nginx.service【默认无需修改】
SSH
[Unit]
Description=nginx service
After=network.target

[Service]
User=root
Type=forking
ExecStart=/usr/sbin/nginx
ExecReload=/usr/sbin/nginx -s reload
ExecStop=/usr/sbin/nginx -s stop
ExecStartPre=/bin/sleep 10

[Install]
WantedBy=multi-user.target
② 设置开机自启
运行以下命令,设置开机自启:
注册并启动启动服务
SSH
sudo systemctl enable nginx.service启动服务
SSH
sudo systemctl start nginx.service检查服务状态
SSH
sudo systemctl status nginx.service重启服务
SSH
sudo systemctl restart nginx.service检查服务状态
SSH
sudo systemctl status nginx.service关闭服务
SSH
sudo systemctl stop nginx.service补充内容:Linux 部署 FileStore 需要注意的事项
1.在 app.json 中需要设置“HostUri”,填写主站点的 IP 与端口号,利用 Nginx 进行端口转发。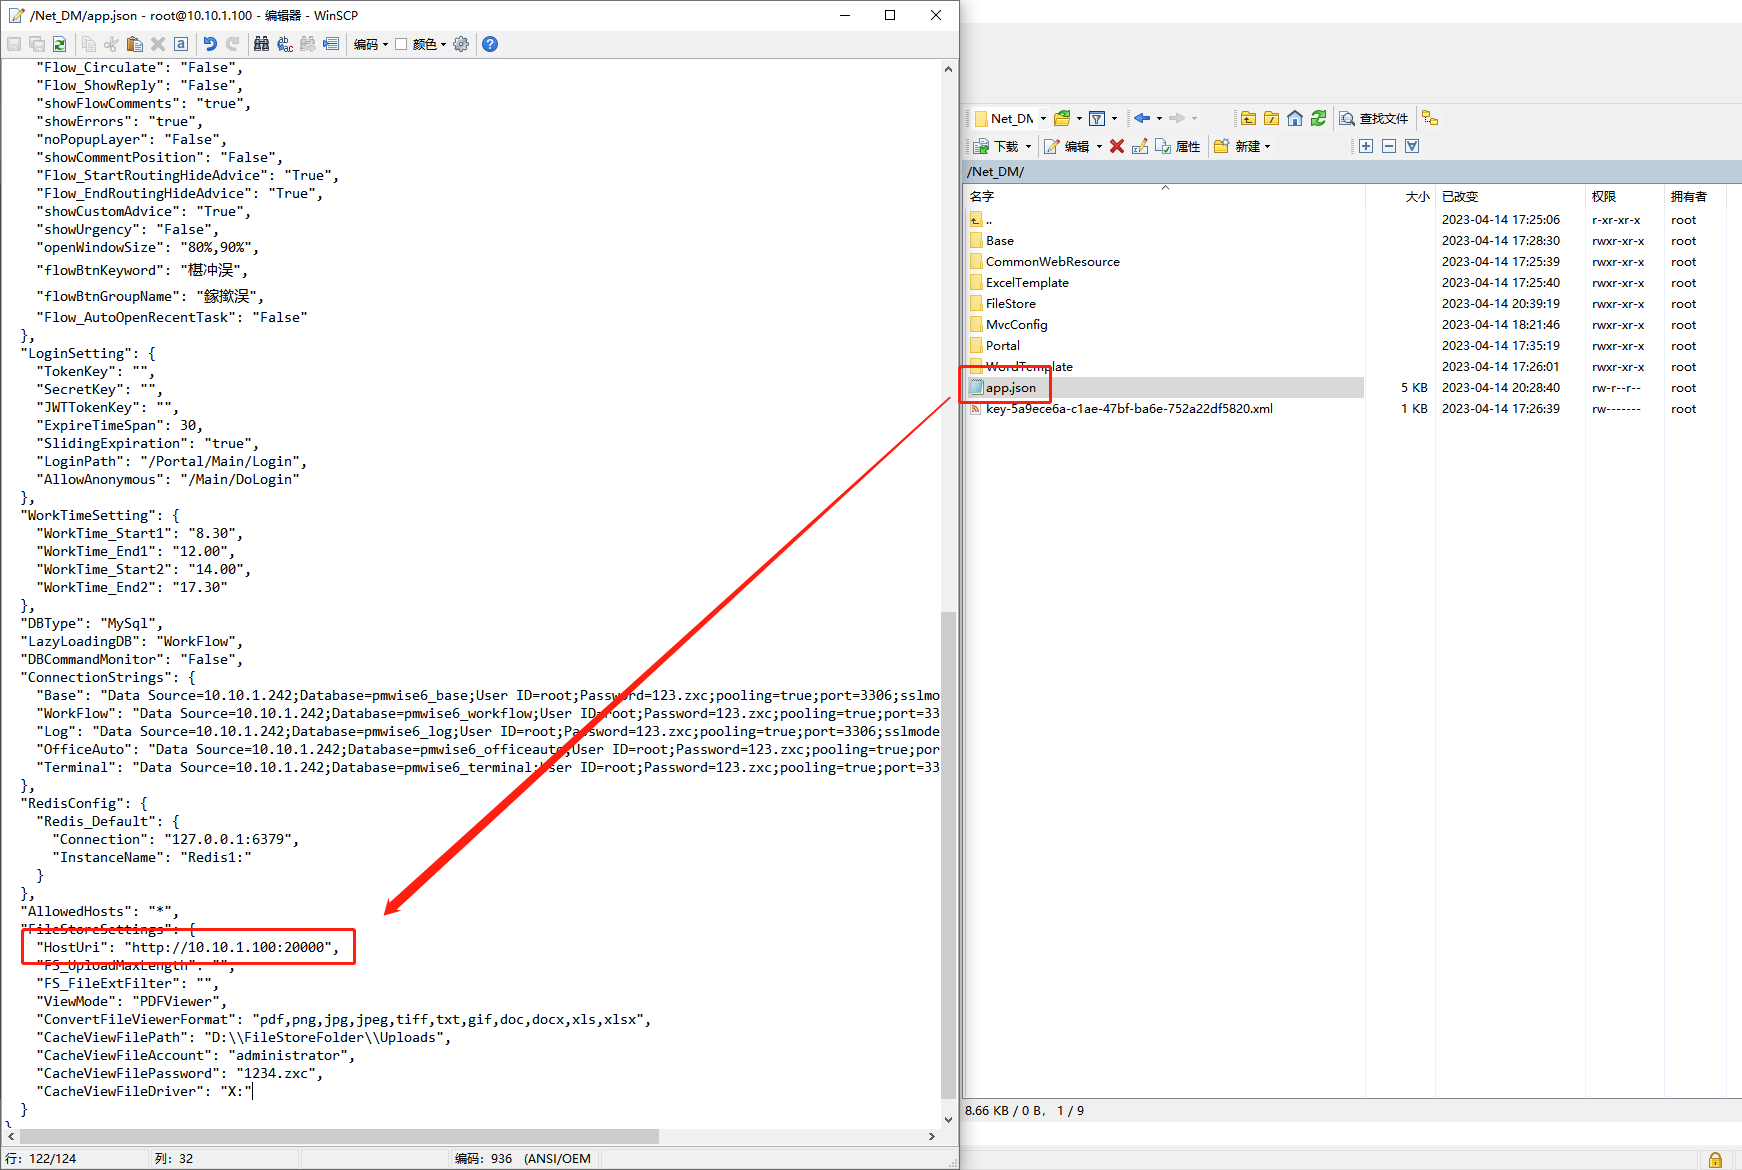
2.配置 Nginx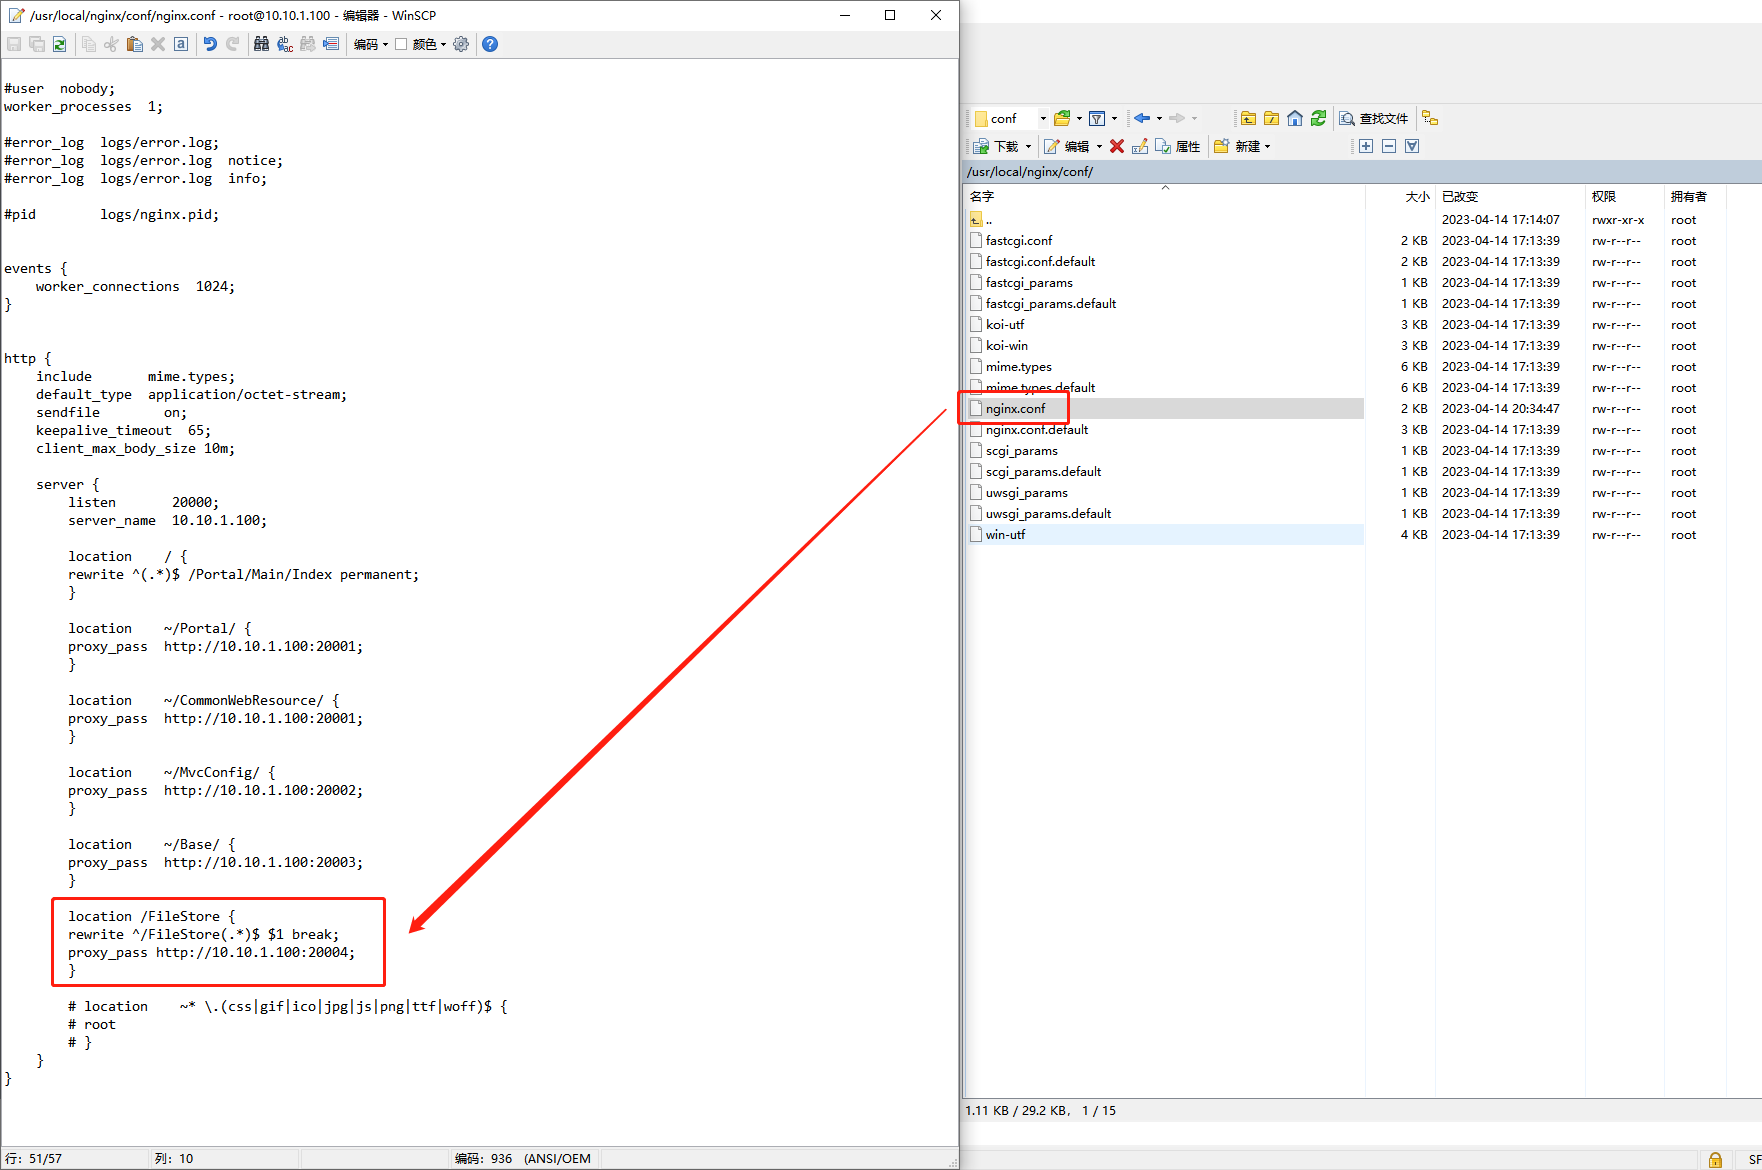
此处的示例表示 FileStore 启动的端口指定为 20004,当系统页面请求接口地址为 http://10.10.1.100:20000/FileStore/AAA/BBB 时,Nginx 会自动转发到 http://10.10.1.100:20004 下的接口。
由于新版 FileStore 为独立的 WebAPI 接口和解决方案,未增加路由地址固定的前缀,需要这样配置。